
Cortex has a number of database connections available for input and output tasks.
For input tasks, the following database connections are supported:
- SQL Server
- Salesforce
- Snowflake
- MongoDB
For output tasks, the following database connections are supported:
- SQL Server
- Snowflake
- MongoDB
This article contains the following sections:
- Connect to a SQL Server Database
- Connect to a Salesforce Database
- Connect to a Snowflake Database
- Connect to a MongoDB Database
Connect to a SQL Server Database
Prerequisites
If connecting to a remote SQL Server database, you will need to configure the SQL Server for remote access. Follow the instructions at Configuring SQL Server for Remote Access before connecting to the remote SQL Server input database.
You will also need to ensure the user credentials used for authentication when logging on to the server have sufficient permissions on the database to which you will connect. Specifically, review the ALTER and SELECT permissions for the database. See Configuring SQL Server Security for more details.
Overview
Use the Database tool in the Input category to connect to and download data from a SQL Server database. You can then specify the table and columns to import into your Cortex workflow.
To connect to SQL Server:
-
Drag a Database Input tool to the Workflow Canvas, then select SQL Server in the Database Type list box to display the SQL Server connection settings.
-
Click the Browse button for the Connection String to display the Connection Properties pane.
- On the Connection Properties pane, enter the Server name.
NOTE: If connecting to a Local Default Instance, enter ‘.’ in the Server name list box. To find a remote server or local named instance, select the Arrow icon and choose the remote server name or enter the server name if your desired instance is not listed.
- Select the database name from the Select or enter a database name list box, then click the OK button.
-
Tables (or views) will load into the Tables list.
-
Choose the table or view from the Tables list, then use the checkboxes in the Columns list to choose the columns for the selected table.
- A SQL statement based on the selected table and columns is generated in the Select Statement pane and refreshes automatically as selections are made.
NOTE: Click the Custom SQL option to modify the generated SQL statement.</dt> This is useful for more complicated SQL statements (e.g., adding a WHERE clause). To verify the syntax of a modified SQL statement, click the Parse SQL button.
- On the Mappings tab, use the Input layout pane to map your fields.
Connect to the SQL Server Database as an Output Task
The Table Schema text box defaults to dbo. You can enter an alternate table schema if necessary.
The Table Name text box in the Output database task is where you specify the name of the new table you wish to output data to.
The Columns list displays the columns being fed into the output from the preceding task.
NOTE: All outputs include a cortex_ID column as the primary key int type column which is displayed as the first column in the output.
Connect to a Salesforce Database
Prerequisites
A Salesforce Security Token and credentials must be entered the first time you connect to a Salesforce database. See Reset Your Salesforce Security Token for information on obtaining a Salesforce Security Token. This information is user-specific and must be entered separately for each user.
NOTE: The Salesforce password format must meet the requirements defined by your organization's Salesforce Password Policy. By default, the Password Policy requires a password which contains at least eight characters, including one alphabetic character and one numeric character.
All connection information is stored in the CortexConnections folder of your local directory, e.g., C:\Users\*username*\CortexConnections. This ensures connection information is retained and will not need to be re-entered for subsequent connections.
NOTE: When connecting to Salesforce, Cortex uses SOAP API.
Overview
Use the Database tool in the Input category to connect to and download data from a Salesforce database. You can then specify the table and columns to import into your Cortex workflow.
NOTE: Salesforce can only be used for an Input Database and is not available as an Output Database.
To connect to Salesforce:
- After dragging the Database tool onto the Workflow Canvas, select Salesforce in the Database Type list box to display the Salesforce configuration settings.
- Enter Salesforce credentials in the Salesforce Username, Salesforce Password and Salesforce Security Token fields.
-
Click the Download Objects List button.
The objects (tables) that are stored in your Salesforce CRM and accessible using the credentials you have supplied display.
- Select an object in the Objects pane.
NOTE: The Objects list is empty until you click the Refresh Object List button, which connects to Salesforce and populates the list. When you select an object from this list, that object’s columns display in the Columns pane.
- Select columns to be used as inputs to the workflow.
NOTE: As needed, click the green Refresh icon to the right of the Columns label to refresh the list, ensuring it is in sync with your Salesforce CRM. This is necessary any time objects in CRM have recently had their column layout updated.
NOTE: It is recommended to only select the needed columns. The rate at which data loads is determined by the number of columns selected. Clicking the Select/Deselect All Columns button to select all columns may result in a slower data load rate.
Using SOQL Query
Use SOQL for more complicated inputs, such as pulling in data from both the Accounts and Contacts tables.
NOTE: SOQL differs from SQL in that the information being built does not display. Use caution when building and parsing SOQL queries.
- Check the Use SOQL Query check box and enter a SELECT query.
-
Click the Parse SOQL button.
When the SOQL query is successfully validated, a message displays letting you know the query was successfully parsed. The elements display in the Input Layout area under Mappings.
Connect to a Snowflake Database
Prerequisites
Cortex connects to Snowflake using Snowflake’s SnowSQL client. SnowSQLmust be installed on your machine before you can connect to Snowflake from Cortex. You can download and install SnowSQL from within Cortex.
The input and output Database tasks contain some new controls for reading from and writing to Snowflake. Before these can be used, you will need a Snowflake account. To set up a free trial account, visit: https://signup.snowflake.com/.
You will also need connection information for the Snowflake database to add to a config file.
Overview
Cortex now offers connection to Snowflake, a cloud-based database service. You can download data from a Snowflake table using the existing input Database task, and you can upload data to a new Snowflake table using the output Database task.
To begin configuring Snowflake connectivity, drag the Database tool to the canvas. In the Input Database tab, select Snowflake from the Database Type list box.
Connect to the Snowflake Database as an Input Task
Set the SnowSQL Installation Directory, if needed.
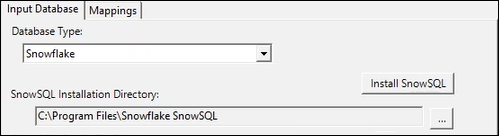
To connect to Snowflake, you must have SnowSQL installed. When you add a new Database task to your workflow canvas that connects to a Snowflake database, Cortex searches for a valid SnowSQL installation on your machine and, if found, automatically populates the above SnowSQL Installation Directory text box.
If you have SnowSQL installed but Cortex does not automatically detect it, click … to browse for the installation directory. Cortex will remember this and you won’t have to repeat this when adding other Database tasks.
If you don’t have SnowSQL installed, click Install SnowSQL and Cortex will download and run the SnowSQL installer. For information about the SnowSQL client, visit https://docs.snowflake.com/en/user-guide/snowsql.html.
Add a Connection to the SnowSQL Config File
The Connection Name list box is populated by connections you add to the SnowSQL config file.
The SnowSQL client requires a SnowSQL config file to be present on your machine. SnowSQL expects to find this file in the .snowsql sub-folder of the current users directory, and the file must be named “config,” e.g., “C:\Users\johns\.snowsql\config”.
The config file must contain at least one connection. A connection is a group of settings that allow SnowSQL to connect to a database within an account. There can be any number of connections set up in your config file. Here is an example:
[connections.mycon]
accountname = AB12345.eu-west-1
username = JSMITH
password = PWORD123!
dbname = DEMO_DB
schemaname = PUBLIC
When you add a Database task that connects to a Snowflake database to your workflow, Cortex will search for a config file and, if found, will list the connections within the config file in the Connection Name list box. If you create a config file or make changes to an existing config file while a Database task is open, click the Refresh icon to the right of the list box to refresh the list.
For information on the SnowSQL config file, visit: https://docs.snowflake.com/en/user-guide/snowsql-config.html#snowsql-config-file
Download or Refresh Table List
When you initially set up a Snowflake connection, the Tables list is blank. Click the Download Table List button. The tables that are stored in your Snowflake database (i.e., the database specified in your connection) display.
NOTE: When you save your workflow, Cortex will only remember the table that you selected and the columns in that table (as they were when the last refresh was performed). Therefore, when you open a saved input Database task, you will not see a full list of tables/columns.
Select Columns
The columns in the selected table display. Select the columns to include and exclude when reading the data input from Snowflake by using the checkboxes.
Connect to the Snowflake Database as an Output Task
The Table Name text box in the output Database task is where you specify the name of the new table you wish to output data to.
NOTE: Snowflake table names must start with alpha characters. An error displays if you attempt to run this task if your output table name doesn’t start with an alpha character.
NOTE: Characters in the Table Name field always display as upper-case.
The Columns list displays the columns that are being fed into the output from the preceding task.
Running Your Workflow Using a Snowflake Database
Concurrent Database Tasks
When running a workflow that contains multiple tasks that connect to Snowflake, two such tasks will not be able to run at the same time due to restrictions on how SnowSQL is executed. Therefore, the second task will wait until the first task has completed.
On-screen Feedback
For a task to connect to Snowflake, it must perform a number of individual steps, including:
- Creating and dropping “stages” (temporary work areas in the cloud to move data to)
- Uploading to and downloading to these stages
- Creating “formats” (format settings relating to the upload/download data layout) and
- Copying data into and out of the Snowflake tables
When a task connects to Snowflake, an info window appears on screen outlining the current step, which helps you see that Cortex’s core Snowflake connector is running and what it’s currently doing.
Log Files
In the background, every time Cortex executes a Database task (or refreshes the Tables list in design time from the input Database task) a log file is created in a Snowflake directory within the Cortex bin folder, e.g., C:\Cortex\bin\Snowflake\SnowSQL-Logs. The logs are organised into folders for each month. Folders that are more than two months old are cleaned up automatically when connecting to Snowflake. Each log file shows the individual steps being taken when downloading/uploading data, along with the queries being sent to Snowflake via SnowSQL. If ever a Snowflake connection generates an error or gets stuck, the log files will help to determine the cause of the problem.
Connect to a MongoDB Database
Cortex offers connection to MongoDB, a cloud-based database service. You can download data from a MongoDB collection (table) using the existing input Database task and similarly you can upload data to a new MongoDB collection using the output Database task.
The input and output Database tasks contain controls for configuring your MongoDB connection and specifying the collection and fields you wish to import into your Cortex workflow or output to another source.
Before creating the connection, create a MongoDB account. To sign up for a free trial visit https://docs.cloudmanager.mongodb.com/tutorial/getting-started/
You must also have a connection string supplied by MongoDB before creating the connection. For more information, see Obtain your MongoDB Connection String.
Using the MongoDB Database Connection as an Input
To add a MongoDB database connection as Input:
- Drag the Database input from the Toolbox onto the canvas.
-
On the Input Database tab, select MongoDB from the Database Type list box.
- Paste the connection string supplied by MongoDB by right-clicking in the Connection String field and selecting Paste.
- Click the Connect button to confirm the connection.
- After the connection is successful, click the Get Database Listing button.
NOTE: The Databases pane lists databases available via your connection string.
- Select a database in the Databases list box.
NOTE: The collections (tables) contained in the selected database display in the Collections pane.
- Select the collection.
NOTE: Click the Refresh icon as needed for the collections and the columns (fields) to ensure data is current.
- Check and uncheck the check boxes to indicate which columns to include and exclude when reading data from MongoDB.
NOTE: Use the Select/Deselect All button to check or uncheck all check boxes for all columns.
Using the MongoDB Database Connection as an Output
You can output data to a MongoDB collection.
- Drag the Database Output from the Toolbox onto the canvas.
- Select MongoDB from the Database Type list box.
NOTE: If you have already entered a MongoDB connection string and database, Cortex retains this data. Skip to step 7 if this is the case.
- Paste the connection string supplied by MongoDB by right-clicking in the Connection String field and selecting Paste.
- Click the Connect button to confirm the connection.
- After the connection is successful, click the Get Database Listing button.
NOTE: The Databases pane lists databases available via your connection string where the output data will be written.
- Select a database in the Databases list.
NOTE: The new collection containing the data that Cortex processed will be created in this database.
- Enter the name in the Collection Name field.
NOTE: The fields that will be written to the new collection display.
NOTE: Changes to mappings and processing are not allowed on an Output task. Make updates earlier in the workflow to change the output. Mappings are performed on the Input step.
Running your Workflow with a MongoDB Database
With MongoDB selected, the input and output database tasks operate very much as they would with SQL Server selected. Multiple tasks connecting to MongoDB run concurrently without any limitations.