
| Previous Article | matchIT Desktop Index | Next Article |
Explanation of Match Keys

Whether matchIT is comparing two databases at a time or finding duplicates within one database, it would take far too long if matchIT compared every record in the database with every other record. To overcome this problem, matchIT generates phonetic and other keys that are used to find groups of records that are worth comparing - these can be described as ”candidate matches”. This screen allows you to select the keys used to find these candidates. You can use any of the fields in the database as matching keys, but you should ensure that they are appropriate. As a general rule, you should select three keys, which instructs matchIT to look through the database using three different search criteria. There should not be a common element to all the keys e.g. you must make sure that Phonetic Surname Key is not contained within every key. This will help ensure that you pick up all duplication, no matter how the data is structured.
Consider the first key listed in the top half of the dialog, Outward Postcode (Town/City) + Phonetic Surname Key. This means that matchIT will look at all groups of records where all of the POST_OUT (outward part/first half of postcode) fields, & the phonetic key of surname are the same, so that it can check which (if any) of these records it should report as potential duplicates. matchIT examines every pair of records within each group looking at all the relevant fields in those two records, and works out a ’score’ that represents how closely they match overall. For example:
- Bill Smith of 24 Church Rise, Leatherhead, KT22 8DT and
- Debra Smyth of 53 Green Lane, Leatherhead, KT22 7BL
...would be compared because they would both have the same phonetic surname key and both of their postcodes start with 'KT22'. However, they would not warrant a score that is high enough for matchIT to show them as a duplicate. However...
- Mr W L Smyth of Church Rise, Leatherhead, KT22 8DD
...would be shown as a potential duplicate of Bill Smith above, because matchIT knows that Bill can be a short form of William and that Smith sounds like Smyth.
Select the option Use default keys from the bottom left of the dialog. You will see that the keys shown below are chosen. The plain English description of these keys is:
- Outward Postcode (Town/City) + Phonetic Surname Key
- Phonetic Surname key + Phonetic street key
- Postcode
You can use these defaults with confidence when finding duplicates in nearly all normal UK data files. In cases where you are dealing with complicated or badly structured data, matchIT has the flexibility to find all of the duplicates, no matter how difficult the data may be to process - but for this you need matchIT training or careful reading of the Online Help or User Manual, with time to experiment.
Scroll down the list of keys, and you will see that any of the fields that occur in one or both databases for overlap, can be used to find duplicates. Fields that begin with a lower case letter have not been standardised by matchIT, and are not as reliable for finding matches as those that have been standardised.
|
If you are selecting match keys rather than using the defaults, you must select New Key before each new match key that you select. |
Household/ Address Matching
This level of matching is used primarily for residential data. Household matching will link records with the same address, regardless of last name.
For example:
- John Smith of 24 Church Rise, Leatherhead, KT22 8DT
- Lucy Jones of 24 Church Rise, Leatherhead, KT22 8DT
Contact/ Individual Matching
Matching at contact level is primarily the same as using individual level matching. Contact matching will deduplicate down to one record per person at a location. Contact level matching will link these two contacts.
For example:
- Jonathan Smith of 24 Church Rise, Leatherhead, KT22 8DT
- Mr J L Smith of 24 Church Rise, Leatherhead, Surrey, KT22 8DT
Even in the following example, the records would be considered as contact level matches.
For example:
- Jonathan Smith, ABC Ltd, 24 Church Rise, Leatherhead, KT22 8DT
- Mr J L Smyth, XYZ Systems, Church Rise, Leatherhead, Surrey, KT22 8DT
This is because, by default, the company name is ignored when looking for contact level matches - perhaps XYZ Systems is part of ABC Group and J Smith acts for both levels of the company, or perhaps the company has changed its name. It is much more common for the records to represent the same person than different people in this kind of scenario.
Company Matching
This level is used to produce one record per company or business, thus ignoring any contact names. Therefore, two different employees working for the same company will be matched, as long as the addresses and Post codes codes match well enough. Company level matching will link the following records.
For example:
- John Smith, XYZ Ltd, 24 Church Rise, Leatherhead, KT22 8DT
- Lucy Jones, XYZ, 24 Church Rise, Surrey, KT22 8DT
|
John Smith |
Lucy Jones |
Household/ Address Match Keys
If you are matching at household i.e. address level, the normal default match keys are not so effective, because two of them include the phonetic key of surname. If you have personal or company names in your data file, it is quite reasonable to use a key that includes surname, as long as the majority of the keys that you use do not rely on the surname key being the same. Therefore, in this case we recommend using the following keys:
- POST_OUT+NAME1 i.e. Outward part of postcode + phonetic surname key
- ADD_KEY+PREMISE i.e. phonetic address key + building or apartment number
- POSTCODE
If you do not have personal or company names in your data file, replace the first key with PUN_TRIM(ADDRESS1+ADDRESS2)+POSTCODE i.e. the first two lines of address, upper cased and with punctuation removed, plus the Postcode.
Exact Matching
You can perform exact matching on any database. Exact matching just does an exact match on one field or a combination of fields - no fuzzy matching or matching weights are used. Exact matching can be carried out, not only using matchIT’s standardized fields (e.g. NAME, POSTCODE, etc), but can also be carried out using fields that matchIT does not recognise (e.g. ACCOUNT, DOB, etc). After selecting the match key(s) you would like to use for exact matching, you need to select the Advanced radio button within the Matching Key and Range window. The option of Fuzzy matching or Exact matching will now appear. As well as selecting a single field as each match key, you can also combine fields to create exact match keys.

Verifying Matches
Once your data file has been imported to matchIT and internally deduped, you have the ability to manually verify each match. You can access this option under the Matching Results window, or use the Verify Matches option under the Matching menu. Alternatively (or after using Verify Matches), you can enter a threshold score at and above which you want to flag records as duplicates, by selecting Flag Matches from the Matching Results window.

This screen, shown below, displays potential duplicates, in pairs. Below each pair the matching score is shown. The matches are shown with the least likely dupes (lowest match scores) first, as you may only want to review the lower scoring pairs. If any pair shown is not a true match, select the False Match button to disregard the match. If you find that most of the matches at the lower scores are false matches, you can use either the  or
or  buttons to flag any records which are true matches at these lower scores.
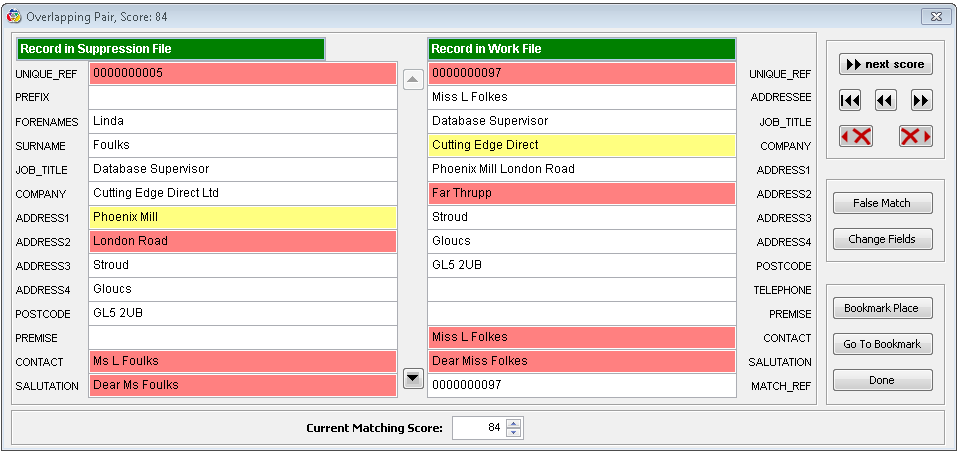
The different colored highlighting is used to help distinguish which fields differ between the two records. Red highlighting is used to show where a field is different between the two records shown, whereas yellow shows that the field contents are a subset of the corresponding field in the matching record.
The buttons in the top right part of the screen control movement through the table; other buttons allow further options. The functions of the relevant buttons are as follows:
 |
Go back to the first pair displayed (lowest matching score selected). |

|
Go back to the previous pair displayed (or press Page Down). |

|
Go forward to the next pair, which may be for a higher score than the current pair displayed (or press Page Up). |

|
Jump to the pair with the next highest score. (A little message "No more scores!" appears in the top right when the end of the pairs is reached.) |

|
If the pair shown is not a true match, you can select this button to remove the match - this means that this pair will no longer be flagged as a match. If you make a mistake, select Restore Match before you move on to the next pair of records (or press Ctrl+Delete. |

|
Select either of these buttons to interactively flag records for deletion (usually just in the lower scoring bands of matches). When you click on one of these buttons, it changes to a green tick. If you click on one of these buttons by mistake, just click on the green tick button to unflag the record. |

|
This button allows you to select different fields to view in the matching pairs, or change the field order (more detail is given in Verify Matches in the User Manual). |

|
This button asks matchIT to remember the current pair so you can return to this pair later. |

|
This button will return to the marked pair. |

|
When you have finished reviewing matches, select Done. |
This window also provides you with powerful data merging tools. Right clicking in either of the records can access these tools. You will then see a drop down menu that offers options such as copy to the left hand or right hand side, cut, paste, and Intelligent Data Merge. Before using the Intelligent Data Merge option, you must set the Intelligent Data Merge priorities from the Matching Setup sub-menu, located in matchIT’s Setup menu.
Verify Matches in Sets

This screen will display potential duplicates, in sets.
The different colored highlighting is used to help distinguish where the differing fields are in the records. Fields in red are different, yellow shows information which is contained in the same field in the other record and white displays those fields which are identical.
The tick boxes between matching records (in the top right part of the screen) control what information is transferred to the Master record.

|
specifies what fields to transfer to the Master record. |

|
transfers selected fields to the Master record. |

|
goes forward to the next page of matching sets. |

|
expands all matching sets shown in the current page of matching sets. |
Below the matching pair display there are various buttons for dealing with that particular matched pair:

|
to flag the duplicate record in the pairs view section, select this button. The button then changes: to "Restore Record" which allows you to unflag the record. |
False Match is Ctrl+Delete
 |
if the pair shown is not a true match, you can select this button to remove the match - meaning that this pair will no longer be regarded as a match. The button then changes: to "Restore Match" which allows you to reactivate the displayed matching pair. |

|
uses the Intelligent Data Merge (see Intelligent Data Merge) settings specified by the user to create a meta-record of the two records shown in the pairs section. |
|
Typically, you either flag false matches in a score band if most of them are true matches, or flag the odd true match if most of them are false. You do not need to both flag false matches and flag true matches within a score band, as a global deletion will flag all matches above a match score as long as they have not been declared false. If you are using the Matrix Report or Group Matches feature, any matches you flag interactively will not be included. To allow this, you can increase the match score of any pair in the grey area, so that you move them into the area that is being automatically flagged or grouped. |

|
quickly find records that contain a piece of information as specified by you. The records that contain the information will then be displayed in the Verify Matches in Sets window. |

|
customizes the "Verify Matches in Sets" window by allowing the user to apply filters and sort orders so that only records of specified concern are displayed. |

|
allows you to enter the name or names of any additional fields that you want to see in the "Matches in Group" section. Just scroll down and type the name of the field at the end of the list. You have to know the exact spelling of the field name or it will not be displayed, but you don't have to specify the field type or width. You can also change the order in which the fields are displayed, by dragging the square button to the left of the name. Then select OK and say "Yes" to the question "Make structure changes permanent". NB: this question refers to the structure of a temporary work file, not the structure of the Main File. |

|
jumps to the first matching set of a specified match score. |
Click "Done" when you have finished.
| Previous Article | matchIT Desktop Index | Next Article |