
| Previous Article | matchIT SQL Index | Next Article |
Mailmark Controller Application
The Mailmark controller application is used for transmitting information about Mailmark sortations directly to The Mailmark handler. The application can be launched from the Mailmark Controller option in the MISQL Mail Sortation task.
As well as transmitting new information to the Mailmark Handler, this application displays live information relating to manifests that are open or have recently expired.
Login
Royal Mail
Before the Mailmark Controller Application can be run and before you can perform any Mailmark sortations, you must first enter your eManifest login details supplied to you by Royal Mail into the System Options. To access the System Options click on the Mail Sortation main menu and then click on Configure System Options
Edit Settings for server: This refers to the two Mailmark Upload Environments, Test and Production, by switching between these you can change the login details for the different environments. This however does not change which environment you will be sending manifests too.
Switch to Production/Test Settings: This option changes whether you will be sending your manifests to in the Mailmark Controller.
Participant ID: Enter your Participant ID as supplied by Royal Mail.
Username: Enter the eManifest user name as supplied by Royal Mail.
Password: Enter the eManifest password as supplied by Royal Mail.
Posting location number: This is the 10-digit number that you will require for OBA mailings (should you not have an OBA number, inputting 9000000000 can be used instead)
Mailer ID: Normally you should leave it as 0. Quoting from the Royal Mail spec: “The Mailer ID is the Mailing House ID (QMP Number) and is held as an attribute of the Posting Location but is only populated if the Posting Location is a Mailing House. A null value of 0 indicates that the customer account is the mailer.
Run Manifest Handler on this System: You should check this box if you are the only user of the system. In the case of a multi-user system, check the box only if your computer is the one that is to control the uploading of manifests. Only one copy of the system should have this box checked.
Check Settings: After entering the login details, click to attempt to connect to the Royal Mail eManifest web servers and proceed to the Manage Manifests screen.
When checking the Mailmark login details which you have entered, you will be presented with a box similar to the one below.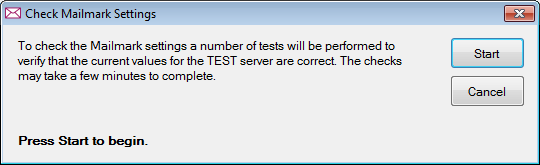
By pressing start, the system will check your login details against Royal Mails eManifest system. Showing a progress log, similar to the one below.
If you are struggling to connect to the eManifest system using your login credentials, looking through this log should be able to help you in identifying the issue. If you are still having issue connecting to the eManifest system and require technical support, please open a ticket with Syniti support at support.syniti.com attaching this log for our support department to help resolve the issue.
UK Mail
To login to the UK Mail eManifest system you will need to input your login details within the UK Mail parameters Mailmark Login section.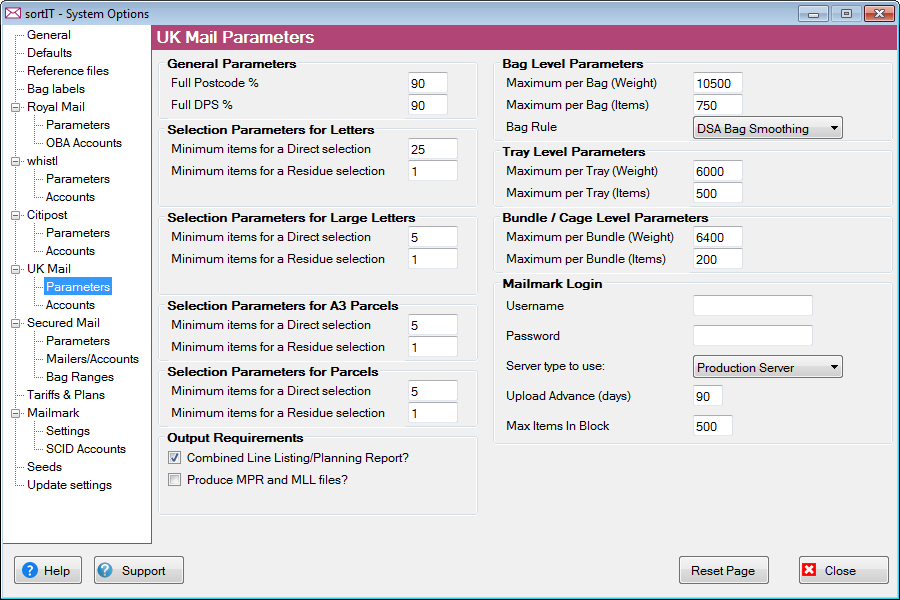
You will also need to make sure that the credentials that you have input match up to the server type that you want to use.
Mailmark Controller
The Mailmark controller enables you to view and edit the details of all of your manifests, both open and expired. As well as giving you the options to upload, submit and confirm your Mailmark jobs.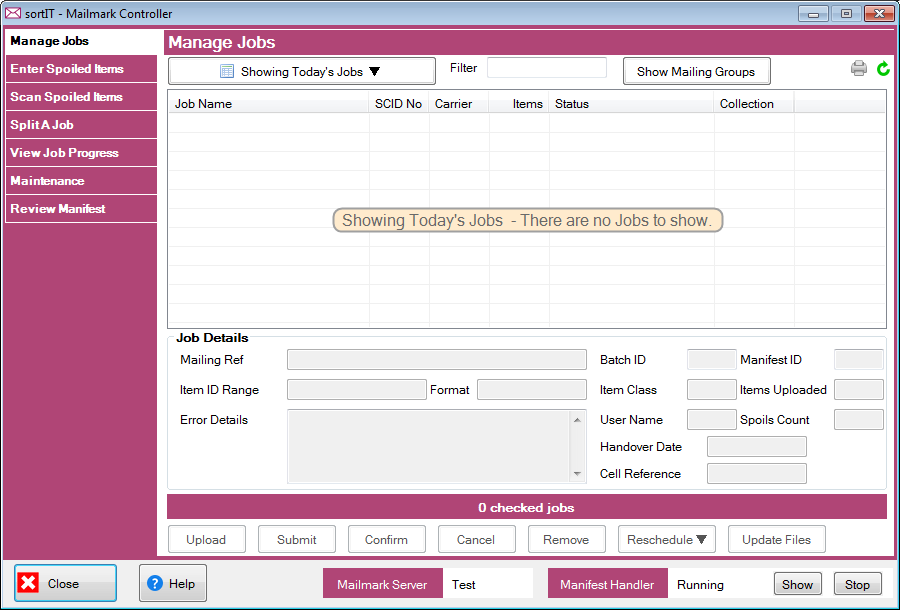
Manage Jobs: The upper part of the Manage Jobs screen contains a group of fields representing the properties of a new Mailmark Job. These fields will be populated with the details from the Mailmark sortation. On the top of the screen you are given 8 options which allow you to change what jobs are shown.
Spoiled Items: There are two tabs within the Mailmark controller for “Spoiled items”. These are items that you do not intend to mail and which you wish to remove from the eManifest.
Enter Spoiled Items: This tab should be used for individual spoiled items, and offers several different methods for identifying anitem, or else for specifying a range of items, for example when the last part of the job cannot be fulfilled because there is an insufficient quantity of brochures available.
Scan Spoiled Items: here, you can use this tab to identify a set of spoiled items through their Mailmark barcode printed on them.
Split A Job: This tab allows you to split your jobs either into a small number of pieces, to process each independently or split the job to process pieces at different dates because of fulfilment problems (or for a combination of both reasons).
View Job Progress: Currently this tab in the Mailmark controller isa “Work in Progress”, but for now, if you have registered to view reports, and have a username and password, then you can click on the link to go to the royal mail website to the EIB Intelligent Barcodes section to see the progress of your job(s).
Maintenance: In this tab you can see all of the Mailmark jobs that you have done, and this screen gives you the option to “delete” them from the Mailmark controller. After you “delete” the job all details of the jobs are removed from the Mailmark database, although the standard output files like the Line Listing and Export files will remain on the system.
Review Manifest: Here you can review the Batches that make up you Mailmark
Manage Jobs
The Manage Jobs screen enables you to view your Mailmark jobs, upload and submit them to the carriers’ handler, as well as confirm the manifest or reschedule the dates for the Job
Job Details section: This section provides information about the Mailmark Job that is being interacted with.
Confirm: Click to confirm that the Job is final. Once a manifest has been confirmed, it can no longer be edited.
Mailmark Jobs grid: This grid lists all of the jobs that are contained within the current Sortation option. Click on a job to select it. Once a job is selected, you can use the buttons below the grid to interact with it.
Reschedule Batch: Click to open the Reschedule Mailing screen (see Reschedule Mailing screen) from which the selected job can be moved to a different date.
Cancel Batch: Click to cancel the selected job. Once a job has been cancelled, it can no longer be edited.
Submit Batch: Click to submit the selected job. Once a job hassubmitted, it is regarded as being in its final state, and cannot be edited or cancelled.
Upload: Clicking this option will upload the job to the chosen carriers Mailmark manifest handler
Enter Spoiled Items
This screen enables you to flag up some of the items within the job, because they are not going to be sent to your mail handler, and you want them to be removed from the Royal Mail eManifest.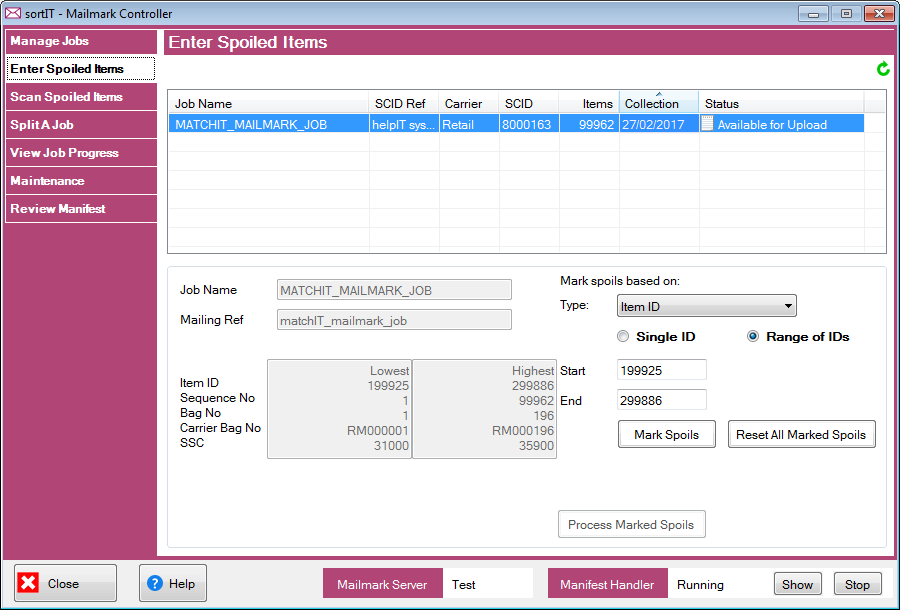
Mark Spoils Based on: Before you can mark the spoils within the job, you need to decide how to find the items to spoil within the Job. This list box allows you to choose how you will be marking the spoils. You are also provided the options to either mark the spoils in group, or singularly by either clicking “Range of IDs” or “Single ID”.
Mark Spoils: After entering a reference point for what to mark as a spoil, click to mark the record(s).
Reset All Marked Spoils: This option will remove any spoils marks from your sortation.
Process Marked Spoils: When you eventually Submit or Confirm the job, the system will apply all the spoils information as part of the Submit process. If, however, the job has already been uploaded, this button will become accessible. If you press this, then the spoils are communicated to Royal Mail straight away, even though you haven’t submitted the job. This is useful in case you forget to confirm it later, and it gets auto-confirmed by Royal Mail.
Split A Job
This screen enables you to select Mailmark Jobs that have been sorted under Royal Mail, and split the jobs into chunks.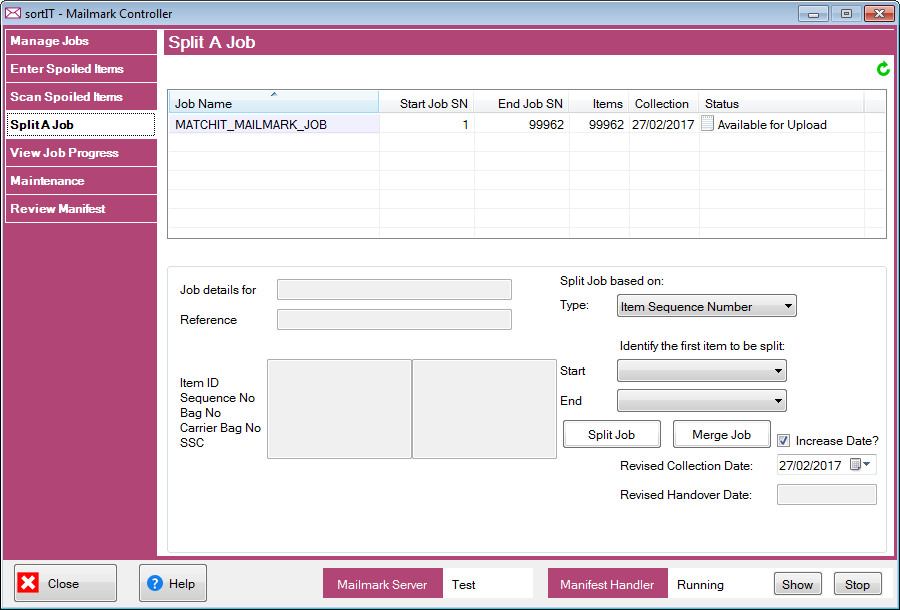
Split Job Based on: Similarly so entering spoiled items, you have a drop down box which allows you to choose what to base a split on. This better helps you to split based on options such as number of letters, or tariffs.
Split Job: After deciding how to split the job, and inputting the relevant information in the input boxes, you then press “Split Job”
Revised Collection Date: If you want, you can also change the collection date for the part of the job that you have split off.
Review Manifest
This tab allows you to enter a Manifest number from the manage Jobs screen, which then allows you to see the Batches within.
If you wish to check a manifest quickly without having to memorise the manifest ID, you can select the Job in the Manage Jobs tab, and that Jobs manifest ID (assuming the Job has been uploaded and received a manifest ID) will be pre-placed into the box at the top of the page.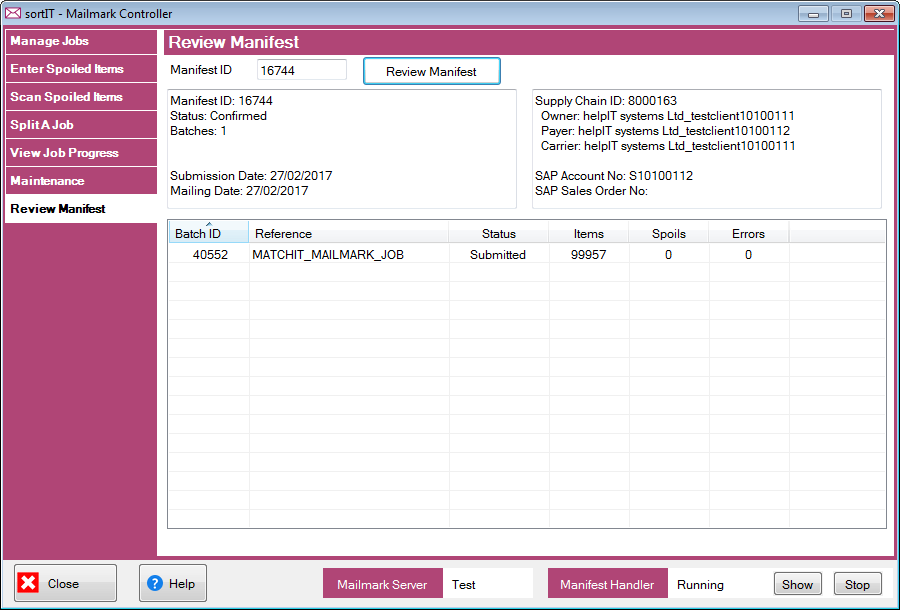
This facility reports on the manifest from Royal Mail’s perspective. You can see more details of the job by clicking on the Printer icon of the Manage Jobs tab, and you can get a Job Report and/or a Manifest Report.
Uploading and Confirming a Manifest
In order to send the Job to your desired mailer you need to upload, submit and then confirm the Job manifests within the Mailmark Controller.
The first step in the process is to upload the manifest; At this stage, the data is stored in the eMHSdatabase, but it is still possible to amend the data, either by entering details of spoiled items, or by cancelling the batch entirely, or by rescheduling the batch to a future date.
When you are sure that a batch is correct, then you tell SortIT to submit the batch. This communicates with the eMHS system to tell it that the Batch is now complete.
When all the batches for a manifest have been submitted, then you tell SortIT to Confirm the manifest. This process should be repeated for any other manifests that have been created for today.
| Previous Article | matchIT SQL Index | Next Article |