
| Previous Article | matchIT SQL Index | Next Article |
This task allows you to run your data against the best-known third party suppression files.
Please contact your Syniti Account Executive for more information on the suppression files available.
Installation
During installation of matchIT SQL, ensure that you have the suppression components box checked:

Notes
- You will need to give the Local Service account db_owner for the matchIT_SQL_Suppression database (the database where all the suppression data is).
-
The user you connect to the suppression database with must have the bulkadmin role
- If you want to run reConnect and append new addresses, you will also need to give the Local Service account the bulkadmin server role in order to append the returned new address data
Using the Suppression Loader
From the Suppression Configuration task, you can launch the Suppression File Loader by clicking on the Load button:

This screen allows you to easily load any of the suppression files that you are receiving from Syniti support. You can also extend this to work with suppression files that you source directly by adding to C:\Program Files\matchIT SQL\bin\SuppressionLoad.xml
To use the loader:
- Simply specify the database connection details.
- Point the dataset file setting at the source data that you need to load.
- Specify the suppkey file and name provided when you purchased the product. Open a support ticket with Syniti support at support.syniti.com if you do not have the suppkey file.
- Load the available suppression datasets by clicking load on the selected configuration file.
- Choose the database to load the files into. Note that if you change this, then you will need to update the other Connection Managers within the SSIS package.
- Select the dataset that you wish to load the source data into.
The Loader will automatically load the datafile into your SQL Server Database and generate the required matchIT SQL match keys at the same time.
Suppression data can now supplied in two files, the first is the suppression data and the second is the keys data. Later versions of matchIT SQL (2.3.5 onward) can use the supplied keys file to import the keys rather than having matchIT SQL generate the keys. This can have a significant performance advantage over generating the keys and reduce the time it takes to import the suppression data.
Suppression Loading via the Command Line
There is also an option to load the suppression files via the command line. This uses SuppressionLoadCLI.exe which can be found in the “C:\Program Files\matchIT SQL\bin” folder.
Each suppression file you want to import requires a configuration file.
Example configuration file:
<?xml version="1.0" encoding="utf-8"?>
<config>
<server>(local)</server>
<authentication>sqlserver</authentication>
<username>Administrator</username>
<password>Password</password>
<datasetFile>D:\SuppressionData\TBR_out.data</datasetFile>
<dataset>TBR</dataset>
<keyFile>CompanyName.suppkey</keyFile>
<keyName>CompanyName</keyName>
<configFile>C:\Program Files\matchIT SQL\bin\SuppressionLoad.xml</configFile>
<errorFile>C:\Program Files\matchIT SQL\temp\supp-error.txt</errorFile>
</config>
All values are required except: username, password, errorFile.
The Datasets code for the relevant Suppression File can be found in the table below:
GAS GAS
MOR Mortascreen
MPF MPS_Original
MPI MPS_Personal
TBR TBR
NCU NCOA_Updates
NDR NDR
RMR Re-mover
NCS NCOA Suppress
NCD NCOA Deceased
Authentication methods: windows, sqlserver.
Windows authentication uses the current user.
Username and password are only used with SQL Server authentication.
The keyFile and keyName are supplied bySyniti so please contact us if you do not already have these.
You can then run the suppression load using the following command:
SuppressionLoadCLI.exe /config=filename.xml
This is useful if you want to automate your suppression loading process.
Utilising the SSIS Suppression Configuration Task
You simply need to drag the task into your workflow and connect it up. The suppression configuration task requires as least one generate keys task in your work flow, similar to our matching tasks. Once you have connected the task to your workflow, you will then need to open the task to configure the settings. There are 3 tabs for the suppression configuration task, please find below a screen shot of each one and information explaining what each option on each tab does.

Job options:
- This is where you can load in the suppression data that we provide to you. More information about the suppression loading process can be in the Suppression Loader section lower down this page.
- This is where you specify the location of the suppression data. This is usually the matchIT_SQL_Suppression database. Please note that it is not possible to use a connection manager in this task.
- If you are using a config for the suppression settings, this is where you can specify the location of the config. This is disabled unless you specify the use of a config file, see point 5 below.
- Here you select the Source of the table you want to suppression. For example here we are suppressing the table “example1”
- Specify this if you want to use a config file for the suppression settings. Please click here for the Suppression Stored Procedure page that describes the use of the config file instead of using the settings in the suppression SSIS task. This is primarily used if you have automated processes and need to dynamically update the settings used by the suppression task.
- Use this if you want to use the suppression settings specified below.
- The recalculate option allows you to re-run a previously run job against a subset of suppression files. For example if you process a job against goneaways and deceased, but now decide you only want to run the table against the deceased suppression files you would use this option. This is much faster than reprocessing the entire job again. You must populate the job name field when using this option. You can get the job name of the previously ran job by looking at the Suppression Log tab, more on this tab later.
- If you accept the suppression costs, then you will be billed for this job when we request for your suppression logs. You can modify this setting for previous jobs on the suppression log tab. For example you can continuously run a suppression job for a client or your own data with this settings off and then when you are finally happy with the results you can accept the suppression costs. Note that full suppression results will not be output until costs are accepted, although it will generate a 10 record matching pair sample.
- This is where you specify the name of the job. This is not needed if you have “Automatically populate job name” enabled (recommended).
- With this option enabled your job name will be automatically generated. It will take the company name and append the date time at run time.
- This is where you specify the company for the job.
- Here is where you can select the suppression files you wish to use. Only the suppression datasets you have loaded will appear. In the example screenshot above the “Do Not Mail” datasets have not been loaded so they do not appear in the list.
- If you have selected reConnect and would like the new addresses returned then you will need to turn this option on. Currently, we cannot supply the reConnect new addresses on site, so with this option enabled it will send the reConnect unique identifier to us, we will then look up the new addresses and then return it to you within the suppression task. Please note, that no source data is sent to us, we only receive a Unique Identifier from the reConnect file that we then use as a lookup. NOTE THAT SWITCHING THIS OPTION ON WILL RESULT IN YOU BEING BILLED FOR THE RECONNECTS MATCHES. If you you are simply doing an audit, leave this option switched off to avoid being billed.
- In order to use the hosted service for reConnect new addresses you will require a hosted service ID. Please contact us if you are interested in this service and we will supply you with an ID.
- Once you are happy with your settings you can click this button.
Using the options config (optional):
The default config file is C:\matchIT SQL\SSIS\suppression\config.xml and contains the following XML which is self explanatory:
- SuppressionDataConnectionString
This is the connection string of where the suppression data is. - JobName
This is the name of the job. - CompanyName
This is the name of the company. - AcceptCosts
This is whether you want to accept the costs for this job. - RecalcOnly
This if you want to rerun a job with a subset of the previously selected suppression files. - SuppressionFIles
Here you list the suppression files you want to suppress against - IncludeNewAddresses
If you want the reConnect new addresses, then set this option to true. Please note this is a hosted service and requires a hosted service ID, please contact us for one. - Matching Level
Select what matching level you want, individual or family. - PermOrTemp
Select what type of suppression you want. - MatchingType
Select what type of matching you want, fuzzy or exact. Exact is faster but you may miss potential suppressions. - HostedServiceID
If you want the new addresses from reConnect then this has to be populated. Please contact us for a Hosted Service ID - AutoJob
If you want your Job Name to be automatically generated from your Company then set this to true. - PowerBIJobName
If you want the suppression results shown in Power BI then populate this with your Power BI job name - Output Settings
This contains the names of the tables that the stored procedure will generate
- suppressionResultsTable
This is the name of the table that contains your suppression hits, the records that were hit against a suppression file- suppressionNewAddressesTable
This is the name of the table that contains the new addresses, if available, from the suppression files.- suppresionPairsTable
This is the name of the table that contains the matching pairs from the suppression. This is a side by side view where you see what records hit what records from the suppression files.- suppressionCleanedTable
This is the name of the table that contains the cleaned table. These are the records that were not on any of the suppression files. This is the table that you would then go onto do further processing with, for example mailsort.
More Options: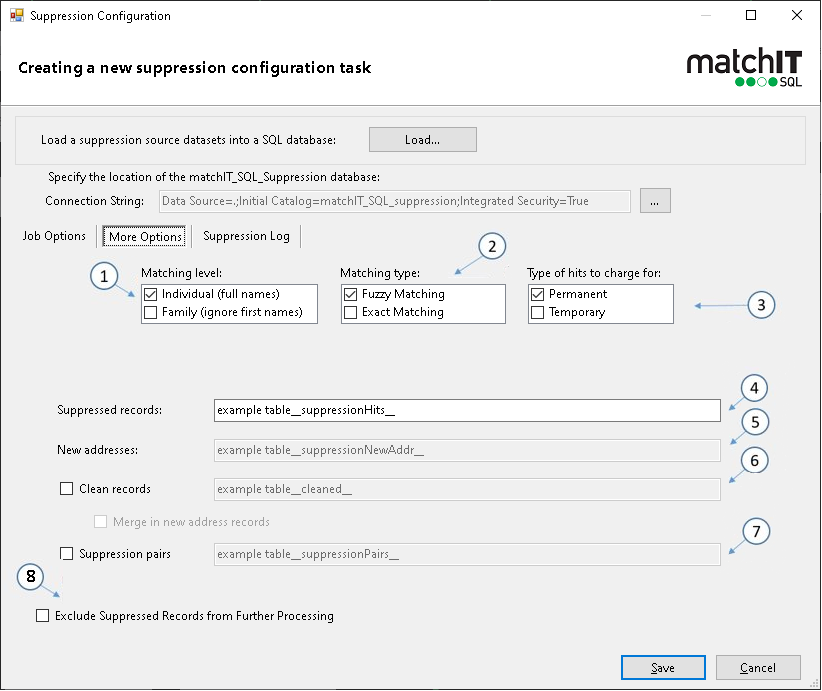
- This is where you can select your matching level. Individual for full name and address match, or family for just surname and address match.
- Matching type determines the type of matching that will be used for finding suppressions. Exact matching is faster than fuzzy but you will potentially miss suppressions.
- Permanent is if you want the suppression type returned from suppressed records, you can then use this to update your own universe. Permanent suppressions are typically more expensive than temporary suppressions.
- This is the name of the table that will be output and contains the records that have been suppressed and what file they were hit against. This table is not available when doing a temporary suppression.
- If you run a suppression job against a file with new address records available (movers) then this table will be output and contains these new addresses.
- This is your net “cleaned” table. This table contains all the records from your source table(s) that were not found against a suppression file. Typically this is the table you would then go on to use for further tasks, such as mail sortation.
- This table contains a side by side view of the matching pairs. You can check what your suppressed records have hit against from the respective suppression file.
- Ticking this option will exclude suppressed records (apart from new addresses) from further processing.
IMPORTANT: When a job is run with Accept Costs unchecked, all results tables are generated but are empty (apart from Suppression Pairs, which contains a 10 record sample).
Please click here for an expanded definition of temporary and permanent suppressions.
Suppression Log:
The Suppression Log tab allows you to see the summary from all previous suppression jobs. You can view jobs by month, see how many records were suppressed against what suppression files, the total cost for the suppression job and also change whether you accept the suppression costs for the job (“Check out the job”).
- This where you can select the month for which you want to see the suppression jobs that have been processed. By default it selects the current month.
- Once a month has been selected it will display all the current jobs from that month. It gives you the time and date that the job was run on, the company, the total cost and whether the suppression costs have been accepted. Selecting different jobs will then change what is displayed underneath it.
- Once a job has been selected, this will display job name.
- Once a job has been selected it will display the total number of records in the job. This is the number of records in the source table(s) that were processed against the suppression files.
- Once a job has been selected, this checkbox will be ticked or unticked depending on whether the suppression costs for this job have been accepted or not. You can then change whether you want to accept the suppression costs or not by ticking or unticking this checkbox appropriately. This can be useful if you want to continuously run a table against suppressions for yourself or for clients and then when you are happy with the results you can tick “Accept suppression costs” for the selected job.
- Once a job has been selected this box will display a breakdown of all the suppression hits. It will you the number of hits against each suppression file you have selected and the total cost for that file.
Please note, costings are calculated from a table in the suppression database (matchIT_SQL_Suppression). The default values in this table may be incorrect for you. Please contact us for your correct costings.
Once the task has been configured you can now run the task. Once complete it will output up to 4 tables in the same database as the source. These are the tables that were described in the “More Options” section.
Additionally, a log file is produced which contains all the hits for the accepted suppression jobs you have processed for the stated month. This will need to be communicated back to Syniti support who will request the logs for the previous month at the beginning of each month new month. By default the file is output to the following directory:
C:\matchIT SQL\SSIS\suppression
For information on running suppressions using Stored Procedures, please click here
Suppression Priorities
Within your matchIT_SQL_suppression database, you will see that there is a table called MISQL_SuppressionPriorities which contains a list of priorities and costs for each suppression dataset. These are used to provide a summary of the cost you will incur when you utilise the suppression datasets. Note that prices change, so this table will only be an indication and should not be relied on for accurate pricing unless you are certain that the costs are accurate.
| Field | Description |
| suppressiontype | maps directly to the container names for the suppression datasets in the SSIS package |
| Priority* | 1 = highest priority |
| TempCost* | Cost of each temporary hit |
| PermCost* | Cost of each permanent hit |
| ResultTableName | Maps to the output from the GroupOverlap task in the suppression container within the SSIS package |
| HasNewAddresses | indicates if the suppression dataset has new addresses for movers |
| SuppressionTableName | Name of the table containing the suppression data |
| NewAddressTableOutput | special for Equifax coaref output |
| isEquifax | special for Equifax datasets that need new address data to be uploaded to Equifax. |
| helpITLog | ‘1’ indicates that hits against this suppression dataset will be output in the log file for upload to Syniti support. |
Fields marked with * are the only fields that should be modified by the user. All other fields, whether covered in the above table or not, should not be modified because they are used by in matchIT SQL suppression processing.
Please note, it is important that there are no suppression files with the same priority because this will cause the suppression processing to fail.
Hardware Recommendations
If you are working with numerous suppression datasets, then it’s strongly recommended that you have suitable hardware to get the most out of the suppression package.
For reference, running through 80,000 records against 14 suppression datasets (including 3 large goneaway datasets making around 345 million suppression records in total) takes around 35 minutes on a 20 core machine, 64Gb RAM and a dedicated REVO drive.
You may find that running too many suppression files at once on lesser spec machines will slow processing.
For Known Common Issues when suppressing please go to the Troubleshooting section
| Previous Article | matchIT SQL Index | Next Article |