
mDesktop gives the user the ability to import a source file into a previously created DBF. This can come in handy for several situations, such as: building a job that you want to run later, or creating a "shell" DBF (see Save and Exit below) for constantly growing files.
Save and ExitSelect this to create a Main File layout with the required fields (including matchIT's fields chosen through the checkboxes), but empty of records. Use this if you want to change any Input or Operational options before importing the file, or if you are setting up Main File layouts to use in the Multiple File Wizard and want to leave the time-consuming process of Import until later. |
|
To import a file into the mDesktop DBF, it must be in the same format as the original file that was used to create the DBF. |
To use mDesktop's import feature, select Import Records from the Import menu. If no DBF is open, you will be prompted for the DBF you would like to import into. Otherwise, make sure the DBF you would like to use is open as the Main DBF. The Input Parameters window will then be displayed (as pictured below). Here you will see what the input format is set to, what the default salutation is, the next reference number to be used, and if mDesktop is set to wait after the import stage.
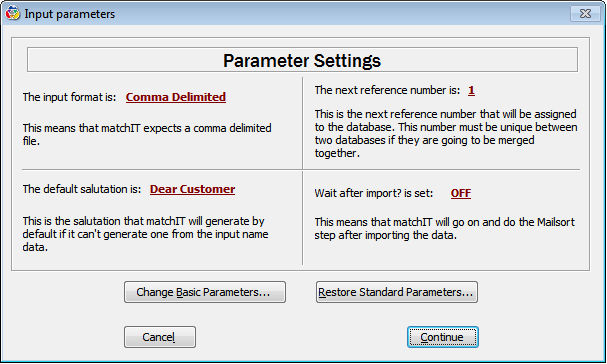
By clicking Restore Standard Parameters, you will be taken to mDesktop's Save/Restore window. To change the DBF's current input format or default salutation, you would select Change Basic Parameters. This option will take you into the mDesktop options window (see Input Options ). Once you have made the necessary changes, select Continue. You will then be prompted for an import file, by default the Files of type will be set by the input format that you previously specified. Once you select the file to Import, mDesktop will begin importing the file into the selected DBF and creating the various keys.
On completion of the Import Records step, the first dialog that is displayed is determined by whether or not the Wait For User option is switched on. If the Wait for user option was off, mDesktop will go directly into the matching process and the next window to be displayed will be the Import Summary report. With the Wait for user option on, a processing window will be displayed offering the option to either Cancel, view the QA Wizard, or to begin the Find Matches step.
The Wait For User option is located in the Operational tab, in the main mDesktop options, which can be accessed by clicking on Change Basic Parameters in the Input Parameters dialog.